Showing posts with label C#. Show all posts

Friday, December 30, 2016

Auto-Playing Slideshow


<%@ Page Language="C#" AutoEventWireup="true" CodeBehind="WebForm2.aspx.cs" Inherits="WebApplication2.Account.WebForm2" %>

<!DOCTYPE html>

<html xmlns="http://www.w3.org/1999/xhtml">
<head runat="server">
    <title></title>

    <style>
        #slideshow {
            margin: 30px auto;
            position: relative;
            width: 640px;
            height: 480px;
            padding: 5px;
            box-shadow: 0 0 20px rgba(0, 0, 0, 0.4);
        }

            #slideshow > div {
                position: absolute;
                top: 5px;
                left: 5px;
                right: 5px;
                bottom: 5px;
            }
    </style>
    <script src="http://ajax.googleapis.com/ajax/libs/jquery/1.5.2/jquery.min.js"></script>
    <script type="text/javascript" charset="utf-8">

        $(document).ready(function () {
            $("#slideshow > div:gt(0)").hide();

            setInterval(function () {
                $('#slideshow > div:first')
                  .fadeOut(1000)
                  .next()
                  .fadeIn(1000)
                  .end()
                  .appendTo('#slideshow');
            }, 3000);
        });


    </script>
</head>
<body>
    <form id="form1" runat="server">
        <div id="slideshow">
            <div>
                <img src="../Images/1.jpg" />
            </div>
            <div>
                <img src="../Images/2.jpg" />
            </div>
            <div>
                <img src="../Images/3.jpg" />
            </div>
            <div>
                <img src="../Images/4.jpg" />
            </div>
        </div>
    </form>
</body>
</html>

Simple Auto-Playing Slideshow
Simple jQuery Slideshow

Thursday, November 17, 2016

Find the index of current row in Grid View

Assume there is a control within a grid view template field. On the TextChanged event, we can get the selected index as below.

[code]
int index = ((GridViewRow)(((TextBox)sender).Parent.Parent)).RowIndex;
[/code]

Wednesday, October 12, 2016

Using the JQuery Select2 with dropdown lists


  • Download select2 style sheets and java scripts. Add them in the header of the page.
[code]
    <script src="../Scripts/select2.js"></script>
    <script src="../Scripts/select2.min.js"></script>
    <link href="../Styles/select2.css" rel="stylesheet" />
    <link href="../Styles/select2.min.css" rel="stylesheet" />

<asp:DropDownList ID="ddlSupplier" runat="server" CssClass="form-control" Width="200px" AutoPostBack="True"></asp:DropDownList>
[/code]

  • Add the following java script to apply the autocomplete option.
[code]
    <script>
        function pageLoad() {
            $("#" + "<%=ddlSupplier.ClientID%>").select2({
                placeholder: "Select Supplier",
                allowClear: true
            });
        }
    </script>
[/code]


  • When the dropdownlist is in a gridview, some changes should be done in the above javascript.
[code]
<script>
    function pageLoad() {
                  $("#<%=GridView1.ClientID %> select[id*='ddlItem']").select2({
            placeholder: "Select an Item",
            allowClear: true
        });
    }
</script>
[/code]

[code]
<asp:TemplateField HeaderText="Item">
    <EditItemTemplate>
        <asp:TextBox ID="TextBox1" runat="server" Text='<%# Bind("ItemName") %>'></asp:TextBox>
    </EditItemTemplate>
    <FooterTemplate>
        <asp:DropDownList ID="ddlItem" runat="server" AutoPostBack="True" CssClass="form-control input-sm" OnSelectedIndexChanged="ddlItem_SelectedIndexChanged" Width="200px">
        </asp:DropDownList>
    </FooterTemplate>
    <ItemTemplate>
        <asp:Label ID="lblItem" runat="server" Text='<%# Bind("ItemName") %>'></asp:Label>
    </ItemTemplate>

</asp:TemplateField>
[/code]


           Select2 3.5.3

Tuesday, October 4, 2016

Save and retrieve images from database using C# in ASP.NET


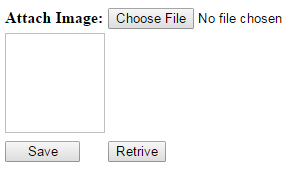
  • Create  the interface with a file uploader and an image like this.
  • Create a table to save images.

  • We'll see how to save an image to the database. Add the following html code to the create the interface.

<head runat="server">
    <title></title>
    <script type="text/javascript" src="http://ajax.googleapis.com/ajax/libs/jquery/1.8.3/jquery.min.js"></script>
    <script type="text/javascript">

        function readURL(input) {
            if (input.files && input.files[0]) {
                var reader = new FileReader();
                reader.onload = function (e) {
                    $('#<%=Image1.ClientID%>').prop('src', e.target.result)
                }
                reader.readAsDataURL(input.files[0]);
                }
            }
            $("#uploadFile").change(function () {
                readURL(this);
            });
    </script>
</head>
<body>
    <form id="form1" runat="server">

        <table>
            <tr>
                <td>
                    <asp:Label ID="Label1" runat="server" Text="Attach Image:" Style="font-weight: 700"></asp:Label>
                </td>
                <td>
                    <asp:FileUpload ID="uploadFile" runat="server" onchange="readURL(this)" />
                </td>
            </tr>
            <tr>
                <td colspan="2">
                    <asp:Image ID="Image1" runat="server" Height="100px" Width="100px" />
                </td>
            </tr>
            <tr>
                <td>
                    <asp:Button ID="btnSave" runat="server" Text="Save" Width="75px" ValidationGroup="Save" OnClick="btnSave_Click" />
                </td>
                <td>
                    <asp:Button ID="btnRetrive" runat="server" Text="Retrive" OnClick="btnRetrive_Click" />
                </td>
            </tr>
        </table>
    </form>

</body>


  • After attaching an image, it shows the preview in the image control.

The image saving code is as follows.

protected void btnSave_Click(object sender, EventArgs e)
{
    int imageId = 1;//Table's first row - default image
    if (uploadFile.PostedFile.FileName != string.Empty)
    {
        imageId = imageUpload();
    }
    Image1.ImageUrl = "Image.aspx?ImageID=" + imageId + "";
}

private int imageUpload()
{
    string filePath = uploadFile.PostedFile.FileName;
    int imageId = 1;
    string filename = Path.GetFileName(filePath);

    string ext = Path.GetExtension(filename);
    ext = ext.ToLower();
    string contenttype = String.Empty;

    switch (ext)
    {
        case ".jpg":
            contenttype = "image/jpg";
            break;
        case ".png":
            contenttype = "image/png";
            break;
        case ".gif":
            contenttype = "image/gif";
            break;
        default:
            break;
    }
    if (contenttype != String.Empty)
    {
        Stream fs = uploadFile.PostedFile.InputStream;
        BinaryReader br = new BinaryReader(fs);
        byte[] bytes = br.ReadBytes((Int32)fs.Length);

        imageId = page6Service.UpdateImage(filename, contenttype, bytes);
    }
    return imageId;
}
  • We can retrieve a particular saved image with the following code

protected void btnRetrive_Click(object sender, EventArgs e)
{
       Image1.ImageUrl = "Image.aspx?ImageID=1";
}


  • To retrieve an image like this, first we have to create a web page as Image.aspx with an empty form. In the Page_Load event of that page add this code.

protected void Page_Load(object sender, EventArgs e)
{
    if (Request.QueryString["ImageID"] != null)
    {
        try
        {
            DataTable dt = page6Service.retrieveImage(Convert.ToInt32(Request.QueryString["ImageID"]));
            if (dt.Rows.Count > 0)
            {
                byte[] bytes = (byte[])dt.Rows[0]["Data"];
                Response.Buffer = true;
                Response.Charset = "";
                Response.Cache.SetCacheability(HttpCacheability.NoCache);
                Response.ContentType = dt.Rows[0]["ContentType"].ToString();
                Response.AddHeader("content-disposition", "attachment;filename=" + dt.Rows[0]["Name"].ToString());
                Response.BinaryWrite(bytes);
                Response.Flush();
                Response.End();
            }
        }
        catch (Exception ex)
        {
            throw ex;
        }
    }
}

Monday, October 3, 2016

Adding date and time picker


[code]
<asp:Content ID="Content1" ContentPlaceHolderID="head" runat="server">
 <script type="text/javascript" src="//cdn.jsdelivr.net/momentjs/latest/moment.min.js"></script>
<script type="text/javascript" src="//cdn.jsdelivr.net/bootstrap.daterangepicker/2/daterangepicker.js"></script>
<link rel="stylesheet" type="text/css" href="//cdn.jsdelivr.net/bootstrap.daterangepicker/2/daterangepicker.css" />
</asp:Content>

<asp:Content ID="Content2" ContentPlaceHolderID="MainContent" runat="server">
    <div class="col-md-2">
        <asp:TextBox ID="txtSessiontime" runat="server" CssClass="form-control" Width="200px" />
        <script type="text/javascript">
            $(function () {

                $("[id$=txtSessiontime]").daterangepicker({
                    singleDatePicker: true,
                    timePicker: true,
                    timePickerIncrement: 15,
                    locale: {
                        format: 'DD-MM-YYYY h:mm A'
                    }
                });
            });
        </script>
    </div>
[/code]

Adding a grid view filter (Part I)


  • First add the grid view to the page.
  • Add the following java script in the header section

[code]
 <script>
        function filter2(phrase, _id) {
            var words = phrase.value.toLowerCase().split(" ");
            var table = document.getElementById(_id);
            var ele;
            for (var r = 1; r < table.rows.length; r++) {
                ele = table.rows[r].innerHTML.replace(/<[^>]+>/g, "");
                var displayStyle = 'none';
                for (var i = 0; i < words.length; i++) {
                    if (ele.toLowerCase().indexOf(words[i]) >= 0)
                        displayStyle = '';
                    else {
                        displayStyle = 'none';
                        break;
                    }
                }
                table.rows[r].style.display = displayStyle;
            }
        }
    </script>
[/code]


  • Then add a search text box with this html code.

[code]
<div class="input-group add-on" style="width: 60%">
        <input name="filter" onkeyup="filter2(this, 'GridView1')" class="form-control" placeholder="Search" type="text" />
        <div class="input-group-btn">
            <asp:LinkButton ID="LinkButton1" runat="server" CssClass="btn btn-default"><i aria-hidden="true"  class="glyphicon glyphicon-search"></i></asp:LinkButton>
        </div>
    </div>
[/code]


  • This filters texts in any column.
Full code

[code]
<asp:Content ID="Content1" ContentPlaceHolderID="head" runat="server">
    <script>
        function filter2(phrase, _id) {
            var words = phrase.value.toLowerCase().split(" ");
            var table = document.getElementById(_id);
            var ele;
            for (var r = 1; r < table.rows.length; r++) {
                ele = table.rows[r].innerHTML.replace(/<[^>]+>/g, "");
                var displayStyle = 'none';
                for (var i = 0; i < words.length; i++) {
                    if (ele.toLowerCase().indexOf(words[i]) >= 0)
                        displayStyle = '';
                    else {
                        displayStyle = 'none';
                        break;
                    }
                }
                table.rows[r].style.display = displayStyle;
            }
        }
    </script>
</asp:Content>
<asp:Content ID="Content2" ContentPlaceHolderID="MainContent" runat="server">
    <div class="input-group add-on" style="width: 60%">
        <input name="filter" onkeyup="filter2(this, 'GridView1')" class="form-control" placeholder="Search" type="text" />
        <div class="input-group-btn">
            <asp:LinkButton ID="LinkButton1" runat="server" CssClass="btn btn-default"><i aria-hidden="true"  class="glyphicon glyphicon-search"></i></asp:LinkButton>
        </div>
    </div>
    <br />
    <asp:GridView ID="GridView1" ClientIDMode="Static" runat="server" Width="60%" CssClass="table table-striped table-bordered table-hover" AutoGenerateColumns="False"
        DataKeyNames="CustomerID" EmptyDataText="There are no data records to display."
        Height="16px" AllowPaging="True">
        <Columns>
            <asp:BoundField DataField="Name" HeaderText="Patient Name" SortExpression="Name">
                <HeaderStyle HorizontalAlign="Left" />
                <ItemStyle Width="170px" />
            </asp:BoundField>
            <asp:BoundField DataField="Address" HeaderText="Address" HeaderStyle-HorizontalAlign="Right" SortExpression="Address" HeaderStyle-CssClass="visible-lg" ItemStyle-CssClass="visible-lg">
                <ControlStyle CssClass="gridViewHeader" />
                <HeaderStyle Width="450px" HorizontalAlign="Left" />
                <ItemStyle HorizontalAlign="left" />
            </asp:BoundField>
            <asp:BoundField DataField="Age" HeaderText="Age" SortExpression="Age" HeaderStyle-CssClass="visible-lg" ItemStyle-CssClass="visible-lg">
                <HeaderStyle HorizontalAlign="Left" />
                <ItemStyle Width="100px" />
            </asp:BoundField>
            <asp:BoundField DataField="Mobile" HeaderText="Mobile" SortExpression="Mobile" ItemStyle-CssClass="hidden-xs" HeaderStyle-CssClass="hidden-xs">
                <HeaderStyle HorizontalAlign="Left" />
                <ItemStyle Width="100px" />
            </asp:BoundField>
        </Columns>
    </asp:GridView>
</asp:Content>
[/code]

Tuesday, September 20, 2016

Dynamically bind data to an rdlc report and load report within a popup window (Part2)


To display the report within another popup window, you have to add some lines to the same code.

Just remove the last line of this method and modify the method as shown as below.

[code] private void getDataSetNames(DataTable[] datatables) { ReportDataSourceCollection dataSources = ReportViewer1.LocalReport.DataSources; this.ReportViewer1.LocalReport.DataSources.Clear(); IList dataSetNames; dataSetNames = this.ReportViewer1.LocalReport.GetDataSourceNames(); for (int i = 0; i < dataSetNames.Count; i++) { dataSources.Add(new ReportDataSource(dataSetNames[i], datatables[i])); } this.ReportViewer1.DataBind(); this.ReportViewer1.LocalReport.Refresh(); } [/code]

Modified method


[code] private void getDataSetNames(DataTable[] datatables) { ReportDataSourceCollection dataSources = ReportViewer1.LocalReport.DataSources; this.ReportViewer1.LocalReport.DataSources.Clear(); IList dataSetNames; dataSetNames = this.ReportViewer1.LocalReport.GetDataSourceNames(); for (int i = 0; i < dataSetNames.Count; i++) { dataSources.Add(new ReportDataSource(dataSetNames[i], datatables[i])); } this.ReportViewer1.DataBind(); string format = "PDF"; string deviceInfo = null; Byte[] results; string fileName = Server.MapPath("../") + "pdf\\report.pdf";//PDF location if (System.IO.File.Exists(fileName)) { System.IO.File.Delete(fileName); } results = ReportViewer1.LocalReport.Render(format, deviceInfo); string p; p = Request.Url.ToString(); string[] parts = p.Split('/'); string[] b = new string[4]; b[0] = parts[0]; b[1] = parts[1]; b[2] = parts[2]; b[3] = parts[3];//change the array items count according the path of the pdf file string a4 = string.Join("/", b); using (FileStream stream = File.OpenWrite(fileName)) { stream.Write(results, 0, results.Length); } Page.ClientScript.RegisterClientScriptBlock(typeof(Page), "ClosePopup", "var popup=window.open('" + a4 + "/pdf/report.pdf','CustomerStatement','toolbar=no,menubar=no,status=yes');popup.focus();", true); ReportViewer1.Visible = false; } [/code]

Friday, July 8, 2016

Dynamically bind data to an rdlc report(Part1)


From this post I'm going to describe how to bind dynamic data to an rdlc report. In here it loads data to the report based on selected value of a drop down. That means we can display different reports based on given parameters.


  • First of all we will do the design of the web page (with a dropdown,a button and a reportviewer) 


  • Then add code behind methods as below.

[code] protected void btnview_Click(object sender, EventArgs e) { string id = ddlId.SelectedValue; string filename = string.Empty; string[] queries = null; if (id == "1") { filename = "Test7-1"; string query1 = "select id,lat from Test3 where id=" + id + ""; string query2 = "select lng,colorId from Test3 where id=" + id + ""; queries = new string[2]; queries[0] = query1; queries[1] = query2; } else if (id == "2") { filename = "Test7-2"; string query1 = "select id,lat from Test3 where id=" + id + ""; string query2 = "select lng,colorId from Test3 where id=" + id + ""; queries = new string[2]; queries[0] = query1; queries[1] = query2; } runRptViewer(filename, queries); ReportViewer1.Visible = true; } private void runRptViewer(string fileName,string[] queries) { DataTable[] datatables = fillDataTables(queries); string reportpath = @"D:\Madara\Reports\" + fileName + ".rdl"; this.ReportViewer1.Reset(); this.ReportViewer1.LocalReport.ReportPath = reportpath; getDataSetNames(datatables); } private DataTable[] fillDataTables(string[] queries) { int queryCount = queries.Length; DataTable[] datatables = new DataTable[queryCount]; for (int i = 0; i < queryCount; i++) { DataTable dt = page6Service.getData(queries[i]); datatables[i] = dt; } return datatables; } private void getDataSetNames(DataTable[] datatables) { ReportDataSourceCollection dataSources = ReportViewer1.LocalReport.DataSources; this.ReportViewer1.LocalReport.DataSources.Clear(); IList dataSetNames; dataSetNames = this.ReportViewer1.LocalReport.GetDataSourceNames(); for (int i = 0; i < dataSetNames.Count; i++) { dataSources.Add(new ReportDataSource(dataSetNames[i], datatables[i])); } this.ReportViewer1.DataBind(); this.ReportViewer1.LocalReport.Refresh(); } [/code]

  • Values of the sql data table.

  • Result will be like this.


Prevent button double click


Add this in page load.

btnGenerateInvoice.Attributes.Add("onclick", " this.disabled = true; " + ClientScript.GetPostBackEventReference(btnGenerateInvoice, null) + ";");

Create a report (RDLC) to show one record per page


  • Bind the data set to the report.


  • Suppose you want to group the data based on Ref No.
  • Add a List control.
  • Drag and drop any attribute from data set inside to that List control.
  • Right click on Details, under Row Groups and select Group Properties.
  • Under General tab, click add and select "Ref No" from Group on.


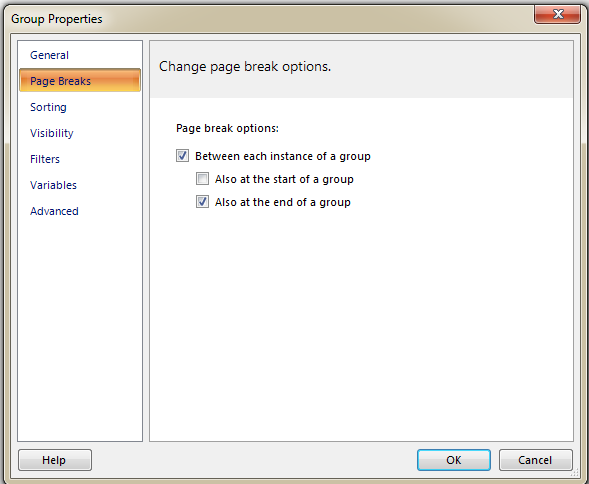
  • Under Page Breaks tab, select the page break options as follows.

  • Then you can design your report as you want.


Friday, February 5, 2016

Create a simple web site (with data base connection)

  • From the menu select  File --> New Project.
  • Give a name for your project and save.
  • Open the Web.config file and add the following lines to create the connection.
[code] <connectionStrings> <add name="AppConString" connectionString="Data Source=[Server name]; Initial Catalog=[Database name]; User ID=[Database username]; Password=[Database password]" providerName="System.Data.SqlClient" /> </connectionStrings> [/code]
  • Create a new folder named "Data" and create a class within it named "DBCon".
  • Add the following lines at the top of the class.
[code]using System.Data; using System.Data.SqlClient; using System.Configuration;[/code]
  •  Add the methods  as follows to open and close connection. 
[code] public class DBCon { public SqlConnection con; public void ReadyConnection() { try { con = new SqlConnection(); con.ConnectionString = ConfigurationManager.ConnectionStrings["AppConString"].ConnectionString; if (con.State != ConnectionState.Open) con.Open(); } catch (Exception ex) { throw ex; } } public void CloseConnection() { try { if (con.State == ConnectionState.Open) con.Close(); } catch (Exception ex) { throw ex; } } } [/code]
  • Add the following methods to deal with the database.
[code] public DataTable GetDataTableFromSQL(string sSQL) { DataTable dataTable = new DataTable(); try { ReadyConnection(); SqlCommand cmd = new SqlCommand(sSQL, con); cmd.CommandTimeout = 0; dataTable.Load(cmd.ExecuteReader()); return dataTable; } catch (Exception ex) { throw ex; } finally { CloseConnection(); } } public DataTable GetDataTableFromSp(string spName, SqlCommand cmd) { try { DataTable dt = new DataTable(); ReadyConnection(); cmd.CommandText = spName; cmd.CommandType = CommandType.StoredProcedure; cmd.Connection = con; cmd.CommandTimeout = 0; dt.Load(cmd.ExecuteReader()); return dt; } catch (Exception ex) { throw ex; } finally { CloseConnection(); } } public bool ExecuteNonQueryFromSQL(string sSQL) { try { ReadyConnection(); SqlCommand cmd = new SqlCommand(sSQL, con); cmd.CommandTimeout = 0; int count = cmd.ExecuteNonQuery(); if (count > 0) return true; else return false; } catch (Exception ex) { throw ex; } finally { CloseConnection(); } } public bool ExecuteNonQueryFromSp(string spName, SqlCommand cmd) { try { ReadyConnection(); cmd.CommandText = spName; cmd.CommandType = CommandType.StoredProcedure; cmd.Connection = con; int count = cmd.ExecuteNonQuery(); if (count > 0) return true; else return false; } catch (Exception ex) { throw ex; } finally { CloseConnection(); } } [/code]

  • Then by calling these methods we can execute the database queries as needed.

Create auto complete drop down list (Windows forms)

[code] List<DataRow> companyList = new List<DataRow>(); DataTable dt = loadEMEIsService.getLocationDetails(); if (dt.Rows.Count > 0) { DataRow dr = dt.NewRow(); dr["Location"] = "---Select---"; dr["ListId"] = -1; dt.Rows.InsertAt(dr, 0); cmbFromLocation.DataSource = dt; cmbFromLocation.DisplayMember = "Location"; cmbFromLocation.ValueMember = "ListId"; this.cmbFromLocation.AutoCompleteSource = AutoCompleteSource.ListItems; this.cmbFromLocation.AutoCompleteMode = AutoCompleteMode.SuggestAppend; } [/code]